Monday, November 22, 2010

Crack pie

Photo by Benji Shirley

We had some friends over for a pre-thanksgiving dinner (we had to stretch our stomachs in preparation for the real day after all).  I was excited to bake the pie to complete the meal and had planned to make a salted chocolate ganache tart, the recipe for which I'd seen in Real Simple. 

I had gone so far as to buy all the ingredients for the tart and was literally about to begin to prepare it when I found myself skimming the archives of Bon Appetit Magazine online. I stopped skimming and started reading when I saw the words "Crack pie." This pie recipe was created by the pastry chef from Momofuku's Milk Bar in NYC.  The reviews were complete raves and let's just say that that apparently, this "Crack" pie was granted its name for a reason.  Anyways, long story short, I just couldn't resist trying out the recipe.

The filling for the pie is essentially a chess pie (which means that it contains every bad-for-you ingredient imaginable...heavy cream, egg yolks, butter, sugar...) And the crust--I love this--is made from crumbled oatmeal cookie that you pre-bake.

The pie was amazing and rich. It has that wonderful buttery sweet flavor of a sugar cookie, while maintaining a delicious soft, almost custard-like texture in the filling. The oatmeal crust has an almost nutty butter flavor and provides a nice textural contrast for the filling.

Overall the recipe was simple, although I had a little bit of trouble getting the crust to smush together into the pie dish. It worked out eventually, although as you can see from the picture it didn't necessarily fill my deep pie dish.

I'm definitely going to keep this recipe filed away although it is so decadent that I will reserve it for the most special of occasions.

Crack Pie
Recipe from Momofuku, published by Bon Appetit. This recipe can also be found here, at the LA Times, but it's important to note that the LA times recipe makes 2 pies. The recipe I've listed below is based on the one published by Bon Appetit and makes one 9 inch pie.


Ingredients:

For the oat cookie crust:
-9 tablespoons of unsalted butter at room temperature
-5 1/2 tablespoons of brown sugar
-2 tablespoons of granulated sugar
-1 large egg
-3/4 plus 2 tablespoons of old-fashioned oats
-1/2 cup all purpose flour
-1/8 teaspoon baking powder
-1/8 teaspoon baking soda
-1/4 teaspoon of salt

For the filling:
-3/4 cup sugar
-1/2 cup packed brown sugar
-1 tablespoon of nonfat dry milk powder
-1/4 teaspoon salt
-1/2 cup unsalted butter, melted and cooled
-6 1/2 tablespoons heavy whipping cream
-4 large egg yolks
-1 teaspoon vanilla extract
-Powdered sugar for dusting pie before serving (I skipped this because I forgot!)

Preparation:

First prepare the oat cookie crust:

Preheat oven to 350°F. Line 13x9x2-inch metal baking pan with parchment paper or a sil pad. If not using sil pad, then oil the baking pan.

Combine 6 tablespoons butter, 4 tablespoons brown sugar, and 2 tablespoons sugar in medium bowl. Using electric mixer, beat mixture until light and fluffy, occasionally scraping down sides of bowl, about 2 minutes.

Add egg; beat until pale and fluffy.

Add oats, flour, baking powder, baking soda, and salt and beat until well blended.

Turn oat mixture out onto prepared baking pan; press out evenly to edges of pan.

Bake until light golden on top, 17 to 18 minutes. Transfer baking pan to rack and cool cookie completely.

In a food processor, pulse to crumble the oat cookie; add 3 tablespoons butter and 1 1/2 tablespoons brown sugar. Pulse further until butter and sugar are well distributed.

The mixture should be moist enough to stick together.

Transfer cookie crust mixture to 9-inch-diameter glass pie dish. Using fingers, press mixture evenly onto bottom and up sides of pie dish. Place pie dish with crust on rimmed baking sheet.

Now prepare the filling: 

Position the rack in the center of your oven and preheat the oven to 350 F.

Whisk together both sugars, milk powder, and salt in medium bowl.

Add the melted butter and whisk until it is blended.

Add the cream, then egg yolks, and vanilla and whisk until well blended.

Pour filling into crust.

Bake pie 30 minutes. Reduce oven temperature to 325 F. Continue to bake pie until filling is brown in spots and set around edges but center still moves a bit when the dish is shaken, about 20 minutes.

Cool pie 2 hours in pie dish on rack. Chill uncovered overnight.


Note: I made this a day in advance and it was nicely set and chilled. If you think of it, sprinkle powdered sugar on the pie before serving although its certainly not required!

Sunday, November 14, 2010

Kale chips


I thought about titling this post "How to make your green vegetables taste like junk food" because really, that is what this is all about.


I must admit that until recently, the autumn kale and greens season was not very exciting to me vegetable-wise. In fact, it was a sad time because it represented the loss of tomatoes, summer squash, basil, and all of those other wondrous flavors of the summer.


But then along came this recipe which was, in and of itself, a game changer. This method of seasoning veggies with olive oil, salt and pepper and baking is just simply amazing. The veggies become crispy and crunchy--like potato chips! They're so tasty that you don't want to stop eating them, and you just might fight with your husband over who gets the last chip.

My only regret is not having learned about this idea earlier on in life. And I don't know--a nutritionist might tell me that this method of preparing greens actually extracts all of the vitamins that exist in the veggies before baking. But I'm quite content living in the bliss of my ignorance.

Kale* Chips, adapted from the Smitten Kitchen blog


Ingredients:
1 bunch of kale (I like dinosaur kale)
Salt
Pepper
Olive oil

To prepare:

1. Preheat oven to 350 degrees.
2. Rinse the Kale, dry, and then chop coarsely & remove stems
3. Spread kale on a cookie sheet for baking (I put mine on a sil pad. If you don't have one of these you might want to use parchment paper, or to oil the pan before placing vegetables)

4. Sprinkle olive oil, salt, and pepper on the kale and mix until the seasonings are well distributed.
5. Bake for 25-30 minutes, until the kale looks crisp and delicious.

*Note: I tried using swiss chard once and this did not turn out well. The swiss chard did not become crispy and crunchy. Rather it remained a soggy limp mess. It was a huge disappointment. Perhaps spinach would work... I can't say for sure. I'd be interested to try. I'm also interested to try this recipe using other vegetables, such as carrots. I'm interested to hear about other people's experiences using this idea but with different veggies.

Monday, October 25, 2010

Plum & pear pie without a soggy bottom


This was another winner and believe me the photo does not do the pie justice in terms of its deliciousness. Plus it doesn't reveal the relative simplicity of this pie recipe--but that's where I come in. The recipe for the crust (which goes only on top of the fruit-this is a bottomless pie!) calls for an egg, room temperature butter, and a great deal more sugar than that which you would typically use. As a result it doesn't boast the flakey texture of most pie crusts, but I really didn't miss it. I don't think anyone who tried this pie did either because it disappeared quickly! AND, the fact that I didn't have to worry about keeping the butter cold made it a dream to whip together (this one really is 'easy as pie' to make). My only regret was not having had ice or whipped cream to go along with the pie, but hey there's always next time.

I found this recipe on the smitten kitchen blog but the recipe was originally written by Nigel Slater. He explains that his idea for this pie was born out of the perpetual problem of juicy fruit in pies creating a soggy bottom. Here, the recipe avoids soggy bottoms by  eliminating the base pastry completely. He compensates for the lack of pastry down below by creating an extra thick pastry on top.

One final note: I substituted pears for apples in my pie. My sister in law suggested this, having tried the recipe herself and I have to say that I loved the texture of the pears along side the plums. Plus, I'm a total sucker for pears in pies in general. Having said that I do imagine that apples would taste really good in here too.

Plum and pear pie without a soggy bottom
Adapted from recipe by Nigel Slater

For the top of the pie (the crust):


100 g of butter
100 g of sugar
one egg 

175 g of  flour (I used pastry flour), 
1/2 tsp of baking powder
a pinch of salt for flavor
milk for brushing the crust before baking


For the filling:
about 8-10 plums 
2 pears (or apples)
2-3 tbsp  of sugar

ground cinnamon,

Use a standing mixer to combine the butter and sugar until they become creamy in texture.

Beat the egg then mix in with butter and sugar. Now add the flour, salt, and baking powder. Roll dough into a ball and then place on a floured work surface. Knead for a minute or two until smooth and soft. Wrap in plastic wrap or stick in an air-tight container and refrigerate for 20-30 minutes.

Set the oven at 180C. Cut the plums in half and remove pits.

Cut the fruit into large pieces, toss with the sugar and cinnamon and put into a lightly buttered 9 inch pie dish.

Roll out the pastry on a floured board, not paying too much attention to the shape, and then place on top of the fruit filling. It doesn't matter if the crust breaks as you place it on top of the fruit. Also you may want to cut a slit into the pastry to allow release of air during baking. Also, there will likely be an eruption of the juices onto the pastry which is a good thing, not a bad, and just contributes to the overall deliciousness.

Brush the pastry lightly with milk and bake for 40 minutes Dust with  sugar and serve warm with ice or whipped cream and don't count of leftovers.

Food in Jars

I'm very excited about my newest food blog discovery: Food in Jars. Check the site out. Most of her recipes involve canning in one way or another. They are all quite creative and offer great inspiration. This is an especially timely discovery, since we have just started to discuss and plan the crafty holiday gifts that we will prepare this year. If you're a loved one and reading this, I just might have given you a hint regarding what you can expect to receive in December. Just maybe. But you'll have to wait and see to be sure.

Tuesday, October 19, 2010

Mushroom ragu and a new cookbook!

Wow- I discovered an amazing new series of cookbooks, Canal House Cooking. You can purchase these seasonal publications individually or subscribe to and receive each volume when it comes out. Volume 5 was just released but I bought volume 2--for now (volume 1 is already out of print. Used copies can be bought on amazon-but for a pretty penny. Whereas the books go for 20$ new, these out of print copies are selling for over 100$ !)

But I can understand why people are willing to pay so much to own a complete series, because the cookbooks are just lovely. The photography is amazing, the colors of the books are gorgeous and the publications have a homemade and scrap-booky feel that is just so comforting in our otherwise clean, glossy, and technological world. I find myself wanting to curl up with this cookbook and just flip through the pages, savoring the images and the colors.

Oh yeah, and on top of all that gushing, the recipes are simple and relatively practical, seasonal, and as I found out tonight, they turn out quite delicious.


I cooked up their recipe for Mushroom ragu on polenta. Here is what they say about this dish:

"We love all sorts of mushroom varieties and this stew lends itself to using a mixture of different shapes, textures, and flavors. If you don't have time to make polenta, serve the ragu over thick slices of crusty toast that have been lightly rubbed with a peeled clove of garlic. Set a poached egg on top of each and grate some parmigiano-reggiano or pecorino over the eggs"


Well it was the middle of the week and I didn't have time to make the polenta and so I went the toasted bread route. I hope to try the polenta version soon, but for now, the toasty-bread/eggy/ragu combo was delicious.

Here's the recipe (with a few adaptations):

For the polenta:
1 cup polenta
Salt
2 tablespoons butter

For the Ragu:
2 tablespoons olive oil
4 tablespoons butter
1 coarsely chopped onion
1 clove garlic, minced
2 pounds shitake (or other) mushrooms)
Thyme
2 tablespoons sherry (I used wine and it was fine)
4 whole peeled plum tomatoes from a can
2 cups chicken stock
1/2 bunch parsley leaves, chopped
Salt and pepper

For the polenta, put 5 cups of cold water into a dutch oven. Stir in the polenta and salt to taste. Bring to a boil over medium-high heat, stirring often. Reduce heat to medium-low and cook the polenta. Stir occassionally until it's tender (probably will be 45-60 minutes). Stir in more water as needed if it gets too thick before it's finished cooking. Stir in the butter and season with salt. The polenta can sit like this while you make the ragu.

For the ragu, heat the olive oil and 2 tablespoons of the butter together in a large skillet over medium heat until the butter foams. Add the onions and garlic and cook these until they become soft and translucent, 3-5 minutes. Add the mushrooms and cook, stirring occassionally, until they begin to soften, about 3 minutes. Add the thyme and sherry. Add the tomatoes, crushing them with your hand as you drop them into the mushrooms. Then add in the stock, the parsley, and the other 2 tablespoons of butter. Simmer the ragu over medium-low heat until becomes stewy and thick, about 20 minutes. Season with salt and pepper as needed. Spoon the mushroom ragu over the warm polenta, or the bread if you are using that. 


Tuesday, October 12, 2010

Raw pizza


You might be saying to yourself, "raw pizza..gross," as images of soggy dough covered by cold sauce and topped with shredded uncooked mozarrella cheese float through your head. But no, this recipe wasn't invented to perpetuate the chipmunk-inspired "raw food" fad. Ovens and elevated cooking temperatures are actually required. In fact, I am calling this a "raw" pizza only because the recipe doesn't ask you to bake the pizza with the various toppings and cheese on top. Instead, you bake your crust, load it up with soft cheese(s), veggies, and herbs and wha-la! You eat it as is. No further baking required. I am a fan of this idea because of the resultant food textures. You have (in theory, at least) a crisp dough and crust, topped with a subtle and soft cheese, and then with herbs and flavorful and crunchy greens and veggies. Yum.

It is perhaps unfortunate that today I had one of those strange moments of ill-conceived inspiration during which I said to myself something along the lines of the following: "Hmm I have a great idea. How about I substitute a different ingredient for everything that is actually listed in the original recipe and hope for the best?" Well I wouldn't exactly call my product the best, but it was good and more than anything else I'd say that my raw pizza pointed to the potential awesomeness that might result if one actually, say, followed the instructions that the recipe provides.

By this point I know that you are gripping your seat and wondering what on earth i did to change around this recipe. Well, please, allow me tell you. Firstly, I changed the flour. The recipe calls for 1.5 cups of all purpose flour. Instead, I mixed together 0.5 cup buckwheat flour, 0.5 cup pastry flour, and 0.5 cup whole wheat flour. Secondly, the recipe calls for 0.25 cup butter. In my attempts to cook a bit more on the healthy side (and despite my proclaimed love for butter that we discussed previously) I substituted 1/4 cup of olive oil for the butter. Third, the recipe calls for rolling sesame seeds into the dough before it is baked. I simply skipped this step completely. Finally, I completely changed the vegetable topping, sauteing spinach and onion with olive oil and lemon juice and spreading on top of ricotta and goat cheeses instead of layering thin slices of zucchini.

I do think that this recipe has a lot of flexibility to adjust, alter and substitute. While I was happy with the flavor of the dough I was disappointed that it was not more crisp. Perhaps next time I will have to return to my use of butter. All in all though I was pleased with this recipe and I definitely plan to revisit it in the future.

In any case the original can be found here, on the Chocolate and Zucchini site.

Sunday, October 10, 2010

Home-made energy bars


I have to rank this as one of the best recipe discoveries that we have made-ever. Really. Truly. No joke. Let me begin to list the ways that this recipe is amazing: 1.) it's relatively easy to throw together, 2.) it's simple and 3.) flexible, 4.) the bars are healthy, and 5.) they actually taste good! This recipe is a delight, too, because the bars actually stay together, unlike the product from many of the other granola bar recipes that I have tried. These fruit and nut bars serve as a great alternative to the store-bought granola or power bar.

There are many ways that one could adjust this recipe: add some extra spices, use alternative sweeteners to maple syrup, add in some butter for added flavor (see on love and butter for more on this subject), add in cocoa powder and/or chocolate chips, use almond or peanut butter instead of the nuts...the possibilities are endless.

Really I speak from personal experience. When I baked these, I depended on what I had in my kitchen at the time. I didn't have almonds but I had almond butter,. I didn't have raisins but I did have cranberries. I didn't have apricots but I did have prunes and figs. And so on. I was very happy with the result despite all of these changes and I am just so pleased to have this recipe in my life.

Here the original recipe, by Elie Krieger, can be found here:

Energy Bars

Wednesday, October 6, 2010

Food thoughts by an insomniac

I'm having one of those toss in the bed unable to sleep nights. Sometimes on such nights, a little uninhibited knoshing does the trick and makes me sufficiently sleepy. I open the refrigerator and take little bits of cheese, spoonfuls of yogurt, and slowly shovel these into my mouth. I open boxes of cereal and often without even bothering to put the content into a bowl, munch away on the dry grains. After a few minutes my tummy feels full and I happily return to bed. Sometimes I leave behind crumbs and open cereal boxes, which serve as evidence of my late-night kitchen escapades. Other times I wipe the kitchen clean and it's as if nothing ever happened. Never mind that there's hardly any cereal left for the morning. It's all worth it and tastes much better at midnight anyways.

In any case, I've wasted too much time already. I'm off to the kitchen.

Saturday, October 2, 2010

First apple pie of the season! and Joyce Maynard


I hadn't made a pie in ages but got a sudden urge on Friday evening after a long and tiring week. And so I ran to the grocery store and bought a pound of apples before my pie baking energy escaped.

In addition to being inspired to bake by the crispness of fall and my need to do something that doesn't involve staring at a computer screen, I had recently stumbled upon Joyce Maynard's website, where I discovered an entry on pie making. Apparently, Joyce Maynard is not only a writer and story teller, but also a pie maker. She teaches her late mother's pie making style and boasts, "I'm guessing the number of my pie students has probably reached the quadruple digits now, and I'm not about to stop. I have been known to travel with a rolling pin." I love Joyce Maynard's pie making spirit, the fact that her teaching of the craft serves a sort of homage to her mother, and that she uses the process of pie making as a metaphor for life. (For example, in her pie making video, Joyce Maynard says that she cuts that apples into uneven pieces since this is the way life is; uneven and unpredictable.)

Apparently, in her recently published book, Labor Day, one of the main characters teachers another to make a pie:

" We were his ticket across state lines. That was the story. I’d watched enough episodes of Magnum P.I.. to get it. Only then Frank turned around to face us, and he was holding a knife.These peaches, he said, looking even more serious than before. If we don’t put them to use soon, they’re goners. What did you have in mind? my mother said. There was a sound to her voice I could not remember ever hearing. She was laughing, not the way a person does if you tell them a joke, but more how it is when they’re just in a good mood and feeling happy. I’m going to make us a peach pie, like my grandmother did it, he said. First thing, he needed a couple of bowls. One to make the crust. One for the filling. Frank peeled the peaches. I cut them up. Filling is easy, Frank said. What I want to talk about is crust.You could tell, the way he reached for his bowl, that this man had made more than a few pies in his life."

The passage continues and provides detailed instructions for making a pie crust. The recipe calls for 3 cups of flour (for a double crust pie), 1 stick of butter, about an equivalent amount of shortening, salt and sugar.

After reading this I was inspired to try Joyce's recipe for pie crust making myself. While I have experimented with using butter, and shortening, separately in pie crusts, I hadn't ever before tried to use both in roughly equivalent amounts.

All in all I was pleased with the pie that I made. However, I had some trouble rolling out the dough. My theory is that this problem results from the fact that I took the oft-cited rule of pie crust making that one should never add too much water to an extreme. As a result, the raw pie crust dough was dry and therefore crumbly and difficult to roll. When baked the pie crust was tasty but remained a bit soggy. After this experiment using shortening + butter I decided that I prefer an all-butter crust, to a butter/shortening one, because of the far superior flavor that the butter provides. The apple filling that I made was quite delicious and consisted of ~ 1 pound of apples, cinnamon, cloves, nutmeg, sugar, lemon juice, rum, and corn starch.

After this pie making experience I was left with renewed energy for pie making, and with ideas for future pies. Stay tuned for more!

Tuesday, September 28, 2010

Olla Podrida


This perfect fall recipe was inspired by a dish that I had during my trip last December to the northern coast of Spain. As you can imagine, we tried many delicious foods while there (god, the food of Spain is just amazing!), but one dish, in particular, a bean and sausage stew that we had in the town of Burgos, was especially memorable. In fact, I've wanted to recreate that meal ever since our trip but it's only now, 9 or so months later, that I mustered up the energy and confidence to try.


After a quick internet search I decided that the dish that I remembered is something that's known as Olla Podrida. The so-called "authentic" recipe calls for blood sausage, which is really hard to come by here in the States. For my stew, I ended up using an Italian Sausage that we bought from a local farmer here in Carrboro--the use of this type of meat in the context of this stew is probably completely atypical and some might even skoff and roll their eyes at the thought of my having done such a thing. But my excuse is that this was meat that I trusted and that I could find relatively easily. So there.


Truth be told I ended up tweaking the recipe a lot--so much so that I don't know that
it's even appropriate that I titled this post "Olla Podrida." Nevertheless the outcome was really tasty. It made our apartment smell amazing and G. already bought the ingredients so that I can make the stew again!! And yes, it was so good that I wanted to record the recipe on this blog, before I forget what I did. And so here goes. This is a really flexible, loosey-goosey recipe (at least in my humble opinion), so enjoy and don't follow the instructions too closely!


Olla Podrida--North Carolina version

1 pound of Italian Sausage
1 pound of dried white beans, such as Great Northern Beans
1 onion, coarsely chopped
5 cloves of garlic, coarsely chopped
2 tablespoons paprika
pinch of saffron
1 can of tomato paste
salt to taste
2-3 bay leaves
4 tablespoons of olive oil
red wine for cooking

1. First, cook the beans, in water and with the bay leaves. I did this in our slow cooker, but use whatever method suits you. I recommend taking them off the stove/out of the slow cooker when the beans remain al dente. This way you can simmer them with the other ingredients and make sure that the beans don't fall apart.

2.When the beans are nearly finished cooking, saute in a dutch oven or large sauce pan the sausage in 2-4 tablespoons of olive oil on medium heat until it is browned and fragrant.

3. Add the onions to the sausage and saute for a 1-2 minutes.

4. Add the garlic and saute with the onion and sausage for a minute.

5. Add the beans, about a cup and a half of the water that they cooked in, the spices, tomato paste, and a nice chug of red wine to the sauce pan. Add salt to taste. Give this a nice mix.

6. Now allow the ingredients to simmer on medium low to medium heat for about an hour or so (or longer, if you have the time).

Serve with crusty bread and a glass of red wine.

Wednesday, September 22, 2010

Welcoming fall

Well hello there, long time no see. My last post was ages ago, in February. Since that time we survived a long, cold winter (especially for North Carolina) and an equally brutal summer. And already it is time to celebrate the arrival of fall. I always become nostalgic during this time. The smells of the season, the falling leaves, they make me sentimental and ever so aware of the cycles of life. The colors and the smells that appear during this time make these things tolerable and beautiful and so any sadness is engulfed by beauty and hope.

But enough of the sentimentality. Fall is also a great time to begin to think about food and cooking again. Because it's now that the days become shorter, the temperatures begin to drop in the evenings, and I want nothing more than to smell spicy warm bubbles emanating from my kitchen. And it is with these thoughts that I resolve to cook more this season and to post more! Because I realized that this blog is a wonderful way for me to catalog the flavors and events of the seasons. Well I guess I missed most of the winter and all of the summer of 2010. Hopefully I will manage to preserve some of fall 2010. And with that I leave you with some food images from these past few months. Until next time!


Sunday, February 14, 2010

Valentines Day Oreos


It all started innocently enough. We were invited to a Valentine's party and I wanted to make cookies. I remembered the homemade oreo cookie that I had tried (and loved) on a previous occasion and thought this the perfect excuse to try the recipe again. Of course I could not resist the idea of making the cookies heart-shaped, but the cheap-skate in me did not permit me to run out and buy a heart shaped cookie cutter for this one occasion. So I searched my house high and low for something that could stand in as a cookie cutter until I discovered an old plastic heart-shaped container that had previously held m&ms. PERFECT. Never mind that this heart-shape was completely enormous and would cut equally enormous chunks of dough that would become even more ridiculously large after baking.


Well, after first batch entered the oven I realized just how bad of an idea this really was. The cookies had trouble holding themselves together, and they grew so large while baking that some of the dough expanded beyond the cookie sheet, fell on an oven coil and started a mini fire that I had to extinguish with baking soda. So much for heart-shaped oreos.

After that fiasco I followed the recipe and took teaspoon sized scoops of dough, shaped these into small balls, and then flattened them to produce more traditional, round cookies. I was still not beyond dying the oreo filling pink in honor of the holiday and so my red food coloring was put to good use.

In any case I'm posting this recipe because the cookies are delicious (esp. when baked the appropriate size). They taste like store-bought oreos ... but oh so much better!


And as you can see, spreading the filling on these cookies is lots of fun:

The recipe can be found on the smitten kitchen blog.

Tuesday, February 2, 2010

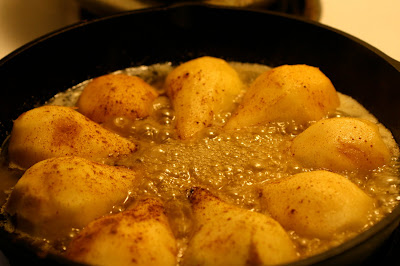
Caramelized pear tart on a snow day


When I heard news of the impending snow storm I did what every respectable southerner does in the wake of such weather reports: I bee-lined it to the grocery store.

And I bought pears. Thank goodness we were already well stocked with milk because my grocery trip would have been pretty disappointing otherwise, given the lack thereof in the already ravaged dairy section.


I really needed those pears though, because there is no better day on which to bake a pie or tart than one on which you are snowed in and feeling cozy and longing for the smells of warm fruit and butter baking in the oven.


I'd been lusting after the recipe for this pear tart for some time--since I saw it on the fantastic pie devoted nothing-in-the-house blog. And let me tell you, this recipe did not disappoint. In fact, I have now declared this my favorite fruit pie/tart recipe of all time. It involves first caramelizing the pears in a cast-iron skillet on the stove top, followed by baking it upside down style, with the crust on top in the oven, and then flipping the whole thing to make the tart face right-side-up.


I really can't express how good this recipe is. The crust does not suffer from the soggy problem that plagues many other fruit pies, and much of the crust ends up with a caramel layer which is so delicious, I do not even have the words.


An added perk to all this is that the cooking process is very beautiful (or at least I found it so--this may be evidenced by the perhaps excessive number of pictures that I've included in this post). But really, starting with the pears themselves, which I think are a particularly nice looking fruit, even when they do have some bruising and spotting on them, and moving on to the process of watching the butter brown and mix with the sugar and then bubble around the pears as they caramelize...this is definitely a picture-worthy process!


CARAMELIZED UPSIDE-DOWN PEAR TART,

from the nothing-in-the house blog,
which she says she found in the Gourmet cookbook:

4 large firm yet ripe Bosc pears
1/2 stick unsalted butter
1/2 cup sugar
1/2 teaspoon cinnamon
Recipe for one half of a pie crust (i.e. the bottom half)

Peel, halve, and core pears. Heat butter in a 9- to 10-inch cast-iron skillet over moderate heat until foam subsides, then stir in sugar (sugar will not be dissolved). Arrange pears, cut sides up, in skillet with wide parts facing out. Sprinkle pears with cinnamon and cook undisturbed, until sugar turns a deep golden caramel. (This can take 15- 25 minutes, depending on pears, skillets, and stove.) Cool pears completely in skillet.

Put oven rack in middle position and preheat oven to 425°F.

Roll out dough on a lightly floured surface with a floured rolling pin into a 12-inch round and trim to a 9 1/2- to 10 1/2-inch round. Arrange pastry over caramelized pears, tucking edge around pears inside rim of skillet. Bake tart until pastry is golden brown, 30 to 35 minutes. Cool 5 minutes.

Invert a rimmed serving plate (slightly larger than skillet) over skillet and, using pot holders to hold skillet and plate tightly together, invert tart onto plate. Serve tart warm with vanilla whipped cream.

Monday, January 25, 2010

Funny cake pie

Happy national pie day, a bit belated. The true date for the holiday was this Saturday January 23rd but it's never too late to celebrate or discuss pies.

In honor of the day I prepared a pie recipe that I've had bookmarked for quite some time. This seemed a very exciting and mysterious recipe because of the supposed party trick that it involves. Please, allow me tell you all about it.


You see, I am a proud member of the of the pie of the month club.

In addition to the fabulous pie of the month club t-shirt and buttons that I received, my membership entitles me to a monthly postcard that features lovely pie art, as well as a fun recipe along with a brief description of the pie.


Truth be told I have not baked many of the recipes from the postcards thus far. Sometimes the pies just sound too weird (For example: watermelon rind pie? I dunno, maybe I'll save that for a summer day on which I'm feeling particularly adventurous).


For now though it was the funny cake pie that caught my attention. The pie features two layers, chocolate and vanilla, with the vanilla layer being especially cake-y in consistency and the chocolate one being more of a cocoa powder goo (which is very tasty and not gross the way the word "goo" sounds).

The recipe boasts that this cake-pie is funny because of a " funny " thing that happens to the two layers: In the pie preparations, you layer the chocolate under the vanilla and then, during the baking process, the two layers flip such that the chocolate layer ends up above the vanilla.

Yes, you read that right. A pie crust with chocolate + vanilla layers that do back flips in the oven. After reading that I was intrigued and just had to try the recipe out.


Let me say that this pie turned out being delicious. Honestly I was surprised by how tasty the end product was because in the end I was a bit tentative about the idea of putting a cake batter in a pie crust. However, I regret that I must also note that I was utterly disappointed by the fact that there was no switcharoo magic that occurred between the two layers in the pie. I had excitedly put the vanilla atop the chocolate and yet the pie came out of the oven with the layers...drum roll...in the same order.

Now, after having performed a google search for other recipes for funny cake pie, I am suspicious that there was a mistake in the pie of the month club recipe. In fact, I think that the chocolate layer should have gone over the vanilla layer and then ended up on the bottom following baking. If anyone reading this has any thoughts about this, or experience baking this particular pie, I'd love to hear them! For now I will say that the next time I bake this pie I plan to layer the chocolate on top of the vanilla and hope for the best in terms of cartwheeling magic between the layers.

In any case, I have reproduced the Pie of the Month Club recipe for Funny Cake Pie below, as it was written on my postcard, but I noted the place in the recipe that I believe to be erroneous. Happy baking and let me know if you manage to get your layers to flip!


Funny Cake Pie
For the Pie of the Month Club
  • Top Part:

    • 1 cup sugar
    • 1 egg, beaten
    • 1/4 cup butter
    • 1 cup flour
    • 1/2 cup milk
    • 1 tsp. baking powder
    • 1/2 tsp. vanilla
    •  I added a dash of salt here
 Cream together sugar and shortening. Add the combined milk and egg alternately with flour and baking powder. Add flavoring and set aside until lower part is mixed.
  • Lower Part:

    • 1/2 cup sugar
    • 6 Tbsp. water
    • 4 Tbsp. cocoa
    • 1/4 tsp. vanilla
    • NOTE: I added a dash of salt here

    Mix together the cocoa, sugar, water, and vanilla. **Pour into an unbaked pie shell. Over this pour the "top part". **The chocolate will come up around the outside edge which gives a nice crusty edge on the finished product. Bake in a 350 degree oven for 35 minutes or until firm (toothpick test).
**OR, perhaps you should try to pour the vanilla cake layer on the bottom of the crust, and then on top of this pour the chocolate top part. I believe that this will create the funny switcharoo effect that I was anxiously awaiting.

Tuesday, January 12, 2010

Monday, January 4, 2010

Dark chocolate tart with ginger snap crust


As it turns out, size does matter. At least it matters when it comes to baking. Unfortunately I discovered the importance of size yesterday when I used a 2-inch-too-large-in-diameter tart pan to bake the chocolate dessert that I'm about to describe. Nonetheless please note that I'm still posting about yesterday's experience. And that's a testament to how awesome this recipe is.

Because yes, even though my baking equipment was all wrong and I lazed-out when I should have made accurate measurements of ingredients (instead I quickly said to myself, "to my little eyeball that looks roughly like 1 and a half cups, sure!"), we still thoroughly enjoyed this tart. Yes, we loved it in spite of the tart not being aesthetically pleasing, the crust being TOO crumbly, and the unhealthy amount anxiety that I experienced about baking times, and when I patted the crust dough into the pan.


Now that I've gotten that out of the way, let me tell you why this recipe rocks: Point 1.) If one uses the correct pan size as well as the appropriate ingredient measurements, the crust recipe is a friggin' cinch and involves only crumbling up some ginger snaps and blending those crumbs with melted butter! Point 2.) PLUS the crust is friggin delicious, boasting a buttery ginger-y flavor. Point 3.) The filling is, like the crust, super simple in terms of preparation requirements and requires the mixing of only a few ingredients. Point 4.) Most importantly, the overall product is a very rich chocolate tart that is delicious and will satisfy any chocoluv-er's (sorry for the pun) cravings.


One final point. What I love even more than chocolate alone is chocolate with a sprinkling of salt on top. I failed to add this magical touch to the tart that I prepared yesterday but intend to do so each and every time I bake this again. If you are into the salty-chocolatey thing too, then I highly recommend that you do the same.


The recipe is posted here, on the smitten kitchen blog, which she found in Bon Appetit. If you check out her post on this recipe you will see how beautiful this tart can come out. I think she used the appropriate tart pan size. And measured out the ingredients properly. Ah, the perfection. She makes me sick, really.