Sunday, February 14, 2010

Valentines Day Oreos


It all started innocently enough. We were invited to a Valentine's party and I wanted to make cookies. I remembered the homemade oreo cookie that I had tried (and loved) on a previous occasion and thought this the perfect excuse to try the recipe again. Of course I could not resist the idea of making the cookies heart-shaped, but the cheap-skate in me did not permit me to run out and buy a heart shaped cookie cutter for this one occasion. So I searched my house high and low for something that could stand in as a cookie cutter until I discovered an old plastic heart-shaped container that had previously held m&ms. PERFECT. Never mind that this heart-shape was completely enormous and would cut equally enormous chunks of dough that would become even more ridiculously large after baking.


Well, after first batch entered the oven I realized just how bad of an idea this really was. The cookies had trouble holding themselves together, and they grew so large while baking that some of the dough expanded beyond the cookie sheet, fell on an oven coil and started a mini fire that I had to extinguish with baking soda. So much for heart-shaped oreos.

After that fiasco I followed the recipe and took teaspoon sized scoops of dough, shaped these into small balls, and then flattened them to produce more traditional, round cookies. I was still not beyond dying the oreo filling pink in honor of the holiday and so my red food coloring was put to good use.

In any case I'm posting this recipe because the cookies are delicious (esp. when baked the appropriate size). They taste like store-bought oreos ... but oh so much better!


And as you can see, spreading the filling on these cookies is lots of fun:

The recipe can be found on the smitten kitchen blog.

Tuesday, February 2, 2010

Caramelized pear tart on a snow day


When I heard news of the impending snow storm I did what every respectable southerner does in the wake of such weather reports: I bee-lined it to the grocery store.

And I bought pears. Thank goodness we were already well stocked with milk because my grocery trip would have been pretty disappointing otherwise, given the lack thereof in the already ravaged dairy section.


I really needed those pears though, because there is no better day on which to bake a pie or tart than one on which you are snowed in and feeling cozy and longing for the smells of warm fruit and butter baking in the oven.


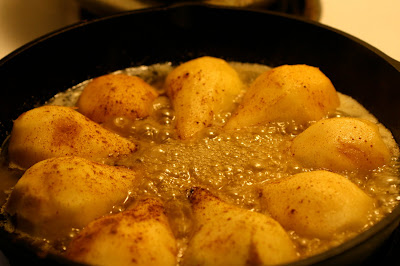
I'd been lusting after the recipe for this pear tart for some time--since I saw it on the fantastic pie devoted nothing-in-the-house blog. And let me tell you, this recipe did not disappoint. In fact, I have now declared this my favorite fruit pie/tart recipe of all time. It involves first caramelizing the pears in a cast-iron skillet on the stove top, followed by baking it upside down style, with the crust on top in the oven, and then flipping the whole thing to make the tart face right-side-up.


I really can't express how good this recipe is. The crust does not suffer from the soggy problem that plagues many other fruit pies, and much of the crust ends up with a caramel layer which is so delicious, I do not even have the words.


An added perk to all this is that the cooking process is very beautiful (or at least I found it so--this may be evidenced by the perhaps excessive number of pictures that I've included in this post). But really, starting with the pears themselves, which I think are a particularly nice looking fruit, even when they do have some bruising and spotting on them, and moving on to the process of watching the butter brown and mix with the sugar and then bubble around the pears as they caramelize...this is definitely a picture-worthy process!


CARAMELIZED UPSIDE-DOWN PEAR TART,

from the nothing-in-the house blog,
which she says she found in the Gourmet cookbook:

4 large firm yet ripe Bosc pears
1/2 stick unsalted butter
1/2 cup sugar
1/2 teaspoon cinnamon
Recipe for one half of a pie crust (i.e. the bottom half)

Peel, halve, and core pears. Heat butter in a 9- to 10-inch cast-iron skillet over moderate heat until foam subsides, then stir in sugar (sugar will not be dissolved). Arrange pears, cut sides up, in skillet with wide parts facing out. Sprinkle pears with cinnamon and cook undisturbed, until sugar turns a deep golden caramel. (This can take 15- 25 minutes, depending on pears, skillets, and stove.) Cool pears completely in skillet.

Put oven rack in middle position and preheat oven to 425°F.

Roll out dough on a lightly floured surface with a floured rolling pin into a 12-inch round and trim to a 9 1/2- to 10 1/2-inch round. Arrange pastry over caramelized pears, tucking edge around pears inside rim of skillet. Bake tart until pastry is golden brown, 30 to 35 minutes. Cool 5 minutes.

Invert a rimmed serving plate (slightly larger than skillet) over skillet and, using pot holders to hold skillet and plate tightly together, invert tart onto plate. Serve tart warm with vanilla whipped cream.